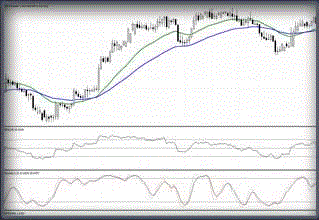
This is a basic idea for trading based on two moving averages.
Time Frame 30 min, 60, min, 240 min.
Currency pairs:majors.
Forex Indicators:
Exponential moving average (EMA 25);
Exponential moving average (EMA 50);
Stochastic oscillator (5,3,3)
RSI (period, 14);
ATR (period. 100).
Rules
Buy
entry LONG position if the are the following conditions:
1. A candle close above the 50 exponential moving average;
2. 2. RSI is a above 50 level.
Sell
Enter
a SHORT position when the are the following conditions:
1.
A candle close below the 50 exponential moving average;
Stop loss and management
Stop losses in this system are relatively easy to set. From the point of entry add 1 x’s or 2
x’s the current ATR value.
Trade management is extremely important with this system. The initial profit taking
target is between 50 and 100 pips. Regardless of what position you have open.
Recommended is to close 50% of your profits at your first target and immediately move
your SL to B/E.
This can sometimes lead to your position being closed out when the price retraces,
leaving you out of trade and possibly missing a greater profit, but it is the safer way to
trade.
Another Risk management option is minimizing your SL by 50% once you hit your initial
target of 50 – 100 pips.
The remainder of the position is left to trail for profits. It is closed out either at historical
S/R or at the cross/touching off Stochastic on the 4 Hour Chart. We do not trade on any
time frame smaller than the 4 Hour Chart.
I recommend you move your SL from B/E to newly created S/R every time the price
moves in your direction so you can better trail it. Of course you may also use an
automated trailing order.
The important thing is to take profit at 50-100 pips after your entry on the candle open.
Fake outs do occur, but when we take profit at 50 – 100 and move to B/E we are safe
even at full price reverse.
This is an H4 System, trades will occur very often, You can expect 100 to +1000 pips.
Recommended to trade GBP JPY or EURJPY due to their volatility and NZDUSD
because it trends steadily.
Exit Optimization
In many instances you will be forced to sacrifice more pips for the safer approach to
trading. I’ve implemented the use of the Stochastic indicator when trading 25-50 EMA
System so you can pinpoint an area on the chart which will leave you exiting your
remaining position at a level you normally wount be able to capitalize on due to risk
management.
Every time the Stochastic indicator begins touching or crossing you should consider
exiting as the price may be pulling back. Naturally with this also occurs the occasion in
which the price pulls back but does not close under the 50 EMA, leaving you out of a
trade and probably having you wish you never exited in the first place. To capitalize on
the bounce an minimize loosing to many pips we take advantage of the 25 EMA.
When price corrects, it will normally test the 50 EMA, if it does not break you will be
looking to reenter, however an immediate reentry or an entry off a close/open after the
bounce from 50 may often be false. In order to reduce this, we wait for price to close
above 25 EMA before attempting another Long in the same direction of our previous
trade. I recommend having a crossing or a touching of the Stochastic Indicator
complement the open/close above 25 EMA when considering a reentry. Yes.. pips will be
missed, but it is the least dangerous approach to the problem.
On the next picture you will see (in order of appearance) an entry, a first exit
optimization area, a trade reentry based on 25 EMA and another Ex. Op. area.
The idea here is to move you SL to a LOW every time the price breaks a High
(BULLISH) and vice versa: move your SL to a HIGH every the price breaks a low
(BEARISH). Use Exit Optimizing when necessary.


Post a Comment