1 min Scalping GBP/USD , GBP/JPY, EUR/JPY, EUR/AUD, NASDAQ 100 is a trend following strategy.
Based on moving averages and MACD.
Setup Strategy
Currency pair: GBP/USD
tradig Session Berlin 8:00 20:00 GMT.
Time Frame: 1 min, 2 min 3 min.
Trading Platform: any.
Indicators:
10 Exponential Moving Averages, close.
21 Exponential Moving Averages, close.
50 Exponential Moving Averages, close.
MACD (12,26, 9).
We trade in either direction - buy or sell; it’s all the same to us.
So that means that whatever we look for as our setup to take a long (that means buy by the way in “trader speak) is the same thing we look for taking a short (that means sell) – except it’s in the opposite direction.
If you don’t quite get it then you’ll see what I’m talking soon enough…
First example is a short trade:
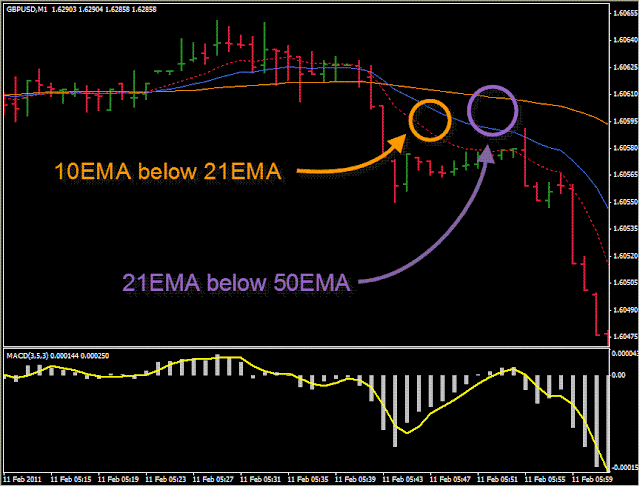
We want the 10EMA to have crossed below the 21EMA
and
we want the 21EMA to have crossed below the 50EMA.
(so far so good!)
The setup will look something similar to this:
Now, believe it or not, we’re nearly there… actually, just believe it.
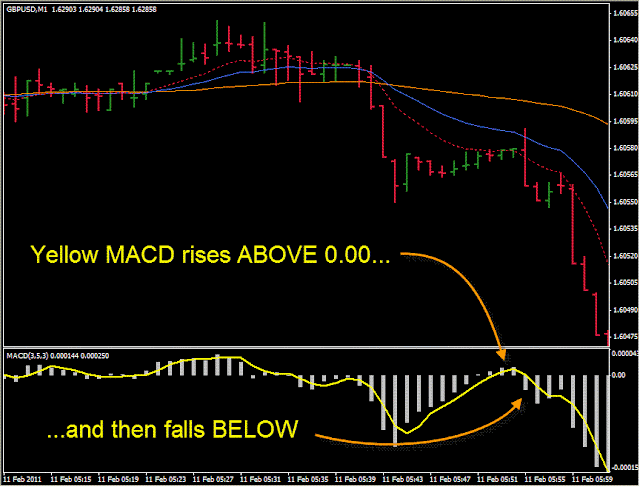
Once we have the above in place (remember, this is for a short setup) we then look for the yellow MACD line to go above ‘0.0’ and then come back down below the ‘0.0’ level.
Would you believe it, we get the yellow MACD line doing exactly what we want in the above example (coincidence? I think not… cunning and strategic planning on my part!).
So we get our setup as follows:
This is our CALL TO ACTION!
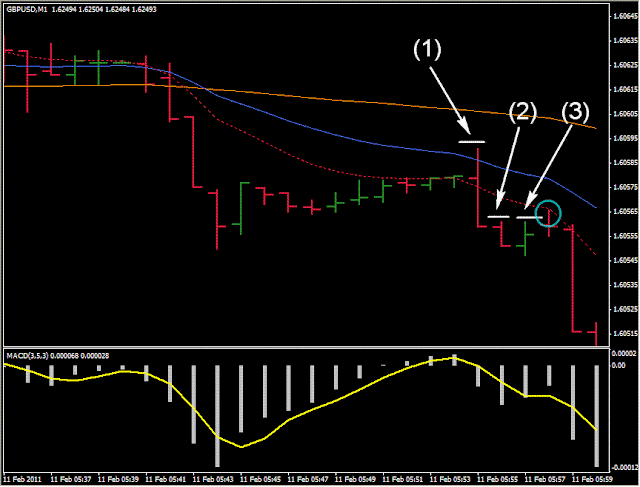
When the bar closes that causes the yellow MACD to close below 0.0 then we enter our short position on the close of that bar (or the open of the next bar – it’s the same thing).
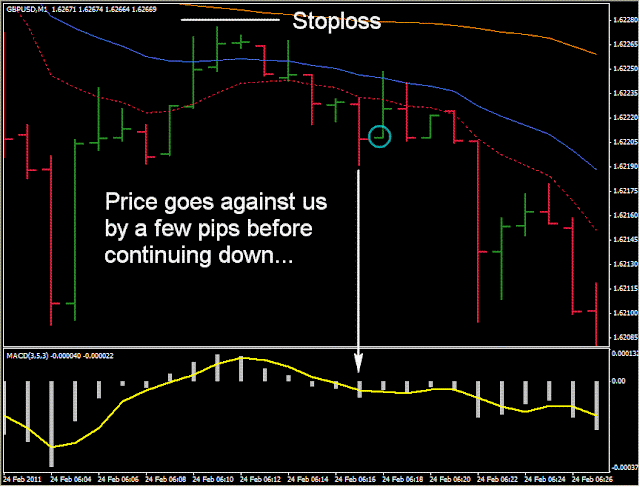
So our entry (and I’ve also pointed out our STOPLOSS too) would be like this:
Like it says on the chart, the yellow MACD only just closed below the ‘0.00’ line. In this case, if you were not sure, then you could certainly have entered on the NEXT bar (and you would only be a couple of pips worse off).
We can see that the market took-off (how convenient, I chose a winning trade for the first example… I just wanted to keep YOU motivated – how nice am I…?!).
Next up comes the exit of the trade. Dear Lord the exit!
The exit of a trade is good when you do good; and bad when you do bad.
I’m going to give it to you straight here: there is a lot of randomness in exits (whether YOU like it or not, skipper!) and so the only thing you can do is just be consistent.
However there are a couple of exit strategies I would like to recommend.
Exit Strategy #1 – Trailing Stoploss
This exit strategy will get you riding some big moves. However, it can also take you out right before a big move happens. You’re not going to always hit it every time, if you get kicked-out before the big move, move on – that’s trading! (harsh but true)
So what is this magical and mystical trailing stoploss that I speak of?
Well, for a 1-bar trailing stoploss (which I’ll now call a ‘1-bar TS’) you simply move your stoploss up (or down) as each new bar is formed. Your stoploss goes underneath (or above) the previous bar to the current one.
Let’s see an example:
The initial stoploss is placed at (1). Then once the next bar is formed the stoploss is placed at (2). The formation of the next bar makes us place the stoploss at (3) – this stoploss is finally hit and we are out of the trade.
Unfortunately we can see that the market carried on down…
A 2-bar trailing stoploss, or 2-bar TS, on the same chart would give us almost the same exit as the above scenario. But instead of exiting when price went above (3) – we would exit when price went above bar (2).
For a 2-bar TS, when we are in a short trade, our stoploss goes above the HIGHEST of the last two bars.
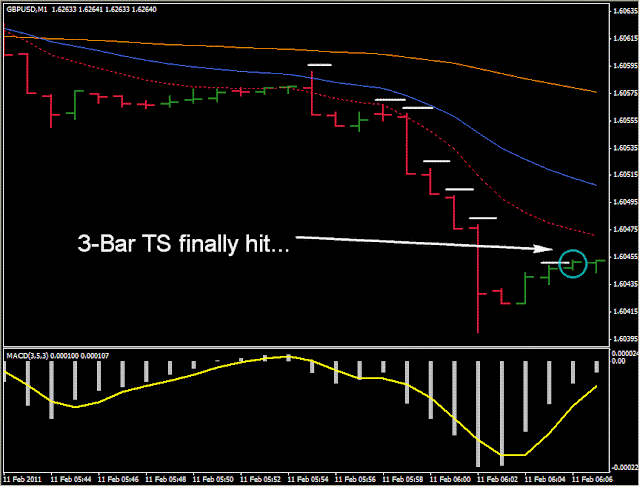
Let’s see this example with a 3-bar TS:
Using a 3-bar TS would keep us in this particular trade for a decent move. But remember – a 3-bar TS, although got us more profit in this trade, can result in less profit in another trade.
So that’s the trailing stoploss exit plan. Have a look back in some charts – I’m pretty sure you will be impressed at how effective it can be!
Exit Strategy #1 – X:1 Take Profit
I’m sure you’re thinking, “what is this ‘x:1’ rubbish he’s talking about?!”… but fear not – I shall now explain.
The ‘x’ is where you decide how much profit you want to take. For example, if your initial stoploss was 10 pips and you decided to take profit on your trade at 10 pips also, this would be a 1:1 take profit.
If your initial stoploss was 10 pips, and you decided to take profit at 30 pips, then you would be using a 3:1 take profit.
Now THAT is simple; too simple? No, nothing can be too simple.
Like I said earlier, trading exiting can be a bit random (although lots of people like to think it isn’t – and are kidding themselves!), so as long as you can stick to a decent exit strategy then your good.
Here’s an example of the x:1 in action (using the previous example):
Now that’s the two exit strategies done and dusted… let’s hit some examples before we hit the beers!
Some Trade Examples
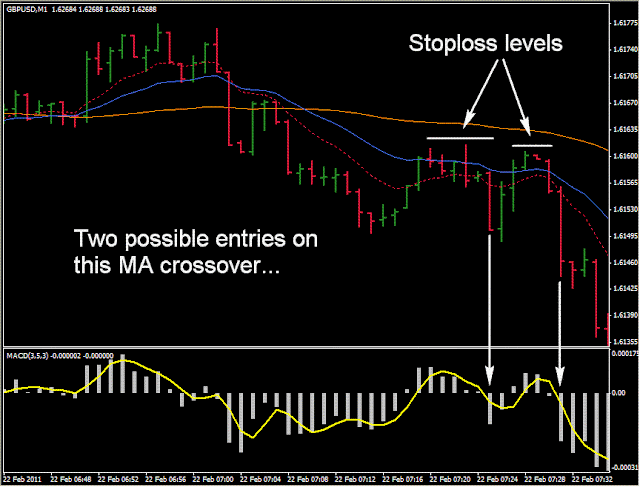
The strategy is pretty simple – but I thought I’d throw in some examples just to make sure you “get it”…




Post a Comment